CDK Quickstart: Unterschied zwischen den Versionen
en>Peter K 1 Version importiert |
Peter (Diskussion | Beiträge) K 1 Version importiert |
(kein Unterschied)
| |
Aktuelle Version vom 31. Oktober 2023, 09:03 Uhr
Preparation
You will need:
- Power Supply (included)
- Ethernet Cable (included)
- Mini-USB Cable (included)
- CDV-BF5xx with eCM-BF561 inserted (included)
- ISM connected to the CDEV-BF5xx (included)
Refer to the picture below for all necessary connections and settings.
Datei:CDEV-BF5xx connections.JPG
- Connect the Ethernet Cable to the CDEV-BF5xx Ethernet Socket (1) and your network. The preflashed IP is 192.168.0.10 make sure that it is available on your network.
- Connect the Mini-USB cable to the Serial Port (2) and your Computer
- Instruction for Driver Installation can be found [here]
- Set the Dipswitch (7) to the correct Bootmode
- Dipswitch: {{#if: 1 | | }}{{#if: 0 | | }}{{#if: 1 | | }}{{#if: 1 | | }}{{#if: | | }}{{#if: | | }}{{#if: | | }}{{#if: | | }}{{#if: | | }}{{#if: | | }}{{#if: 1 | {{#ifeq: 1 | 1 | | {{#ifeq: 1 | X | | }} }} | }}{{#if: 0 | {{#ifeq: 0 | 1 | | {{#ifeq: 0 | X | | }} }} | }}{{#if: 1 | {{#ifeq: 1 | 1 | | {{#ifeq: 1 | X | | }} }} | }}{{#if: 1 | {{#ifeq: 1 | 1 | | {{#ifeq: 1 | X | | }} }} | }}{{#if: | {{#ifeq: | 1 | | {{#ifeq: | X | | }} }} | }}{{#if: | {{#ifeq: {{{6}}} | 1 | | {{#ifeq: {{{6}}} | X | | }} }} | }}{{#if: | {{#ifeq: {{{7}}} | 1 | | {{#ifeq: {{{7}}} | X | | }} }} | }}{{#if: | {{#ifeq: {{{8}}} | 1 | | {{#ifeq: {{{8}}} | X | | }} }} | }}{{#if: | {{#ifeq: {{{9}}} | 1 | | {{#ifeq: {{{9}}} | X | | }} }} | }}{{#if: | {{#ifeq: {{{10}}} | 1 | | {{#ifeq: {{{10}}} | X | | }} }} | }}{{#if: 1 | {{#ifeq: 1 | 0 | | {{#ifeq: 1 | X | | }} }} | }}{{#if: 0 | {{#ifeq: 0 | 0 | | {{#ifeq: 0 | X | | }} }} | }}{{#if: 1 | {{#ifeq: 1 | 0 | | {{#ifeq: 1 | X | | }} }} | }}{{#if: 1 | {{#ifeq: 1 | 0 | | {{#ifeq: 1 | X | | }} }} | }}{{#if: | {{#ifeq: | 0 | | {{#ifeq: | X | | }} }} | }}{{#if: | {{#ifeq: {{{6}}} | 0 | | {{#ifeq: {{{6}}} | X | | }} }} | }}{{#if: | {{#ifeq: {{{7}}} | 0 | | {{#ifeq: {{{7}}} | X | | }} }} | }}{{#if: | {{#ifeq: {{{8}}} | 0 | | {{#ifeq: {{{8}}} | X | | }} }} | }}{{#if: | {{#ifeq: {{{9}}} | 0 | | {{#ifeq: {{{9}}} | X | | }} }} | }}{{#if: | {{#ifeq: {{{10}}} | 0 | | {{#ifeq: {{{10}}} | X | | }} }} | }}{{#if: 1 | | }}{{#if: 0 | | }}{{#if: 1 | | }}{{#if: 1 | | }}{{#if: | | }}{{#if: | | }}{{#if: | | }}{{#if: | | }}{{#if: | | }}{{#if: | | }}
1 2 3 4 5 6 7 8 9 0
- Dipswitch: {{#if: 1 | | }}{{#if: 0 | | }}{{#if: 1 | | }}{{#if: 1 | | }}{{#if: | | }}{{#if: | | }}{{#if: | | }}{{#if: | | }}{{#if: | | }}{{#if: | | }}{{#if: 1 | {{#ifeq: 1 | 1 | | {{#ifeq: 1 | X | | }} }} | }}{{#if: 0 | {{#ifeq: 0 | 1 | | {{#ifeq: 0 | X | | }} }} | }}{{#if: 1 | {{#ifeq: 1 | 1 | | {{#ifeq: 1 | X | | }} }} | }}{{#if: 1 | {{#ifeq: 1 | 1 | | {{#ifeq: 1 | X | | }} }} | }}{{#if: | {{#ifeq: | 1 | | {{#ifeq: | X | | }} }} | }}{{#if: | {{#ifeq: {{{6}}} | 1 | | {{#ifeq: {{{6}}} | X | | }} }} | }}{{#if: | {{#ifeq: {{{7}}} | 1 | | {{#ifeq: {{{7}}} | X | | }} }} | }}{{#if: | {{#ifeq: {{{8}}} | 1 | | {{#ifeq: {{{8}}} | X | | }} }} | }}{{#if: | {{#ifeq: {{{9}}} | 1 | | {{#ifeq: {{{9}}} | X | | }} }} | }}{{#if: | {{#ifeq: {{{10}}} | 1 | | {{#ifeq: {{{10}}} | X | | }} }} | }}{{#if: 1 | {{#ifeq: 1 | 0 | | {{#ifeq: 1 | X | | }} }} | }}{{#if: 0 | {{#ifeq: 0 | 0 | | {{#ifeq: 0 | X | | }} }} | }}{{#if: 1 | {{#ifeq: 1 | 0 | | {{#ifeq: 1 | X | | }} }} | }}{{#if: 1 | {{#ifeq: 1 | 0 | | {{#ifeq: 1 | X | | }} }} | }}{{#if: | {{#ifeq: | 0 | | {{#ifeq: | X | | }} }} | }}{{#if: | {{#ifeq: {{{6}}} | 0 | | {{#ifeq: {{{6}}} | X | | }} }} | }}{{#if: | {{#ifeq: {{{7}}} | 0 | | {{#ifeq: {{{7}}} | X | | }} }} | }}{{#if: | {{#ifeq: {{{8}}} | 0 | | {{#ifeq: {{{8}}} | X | | }} }} | }}{{#if: | {{#ifeq: {{{9}}} | 0 | | {{#ifeq: {{{9}}} | X | | }} }} | }}{{#if: | {{#ifeq: {{{10}}} | 0 | | {{#ifeq: {{{10}}} | X | | }} }} | }}{{#if: 1 | | }}{{#if: 0 | | }}{{#if: 1 | | }}{{#if: 1 | | }}{{#if: | | }}{{#if: | | }}{{#if: | | }}{{#if: | | }}{{#if: | | }}{{#if: | | }}
- Plug in your Power Supply (5)
Powering up and Booting
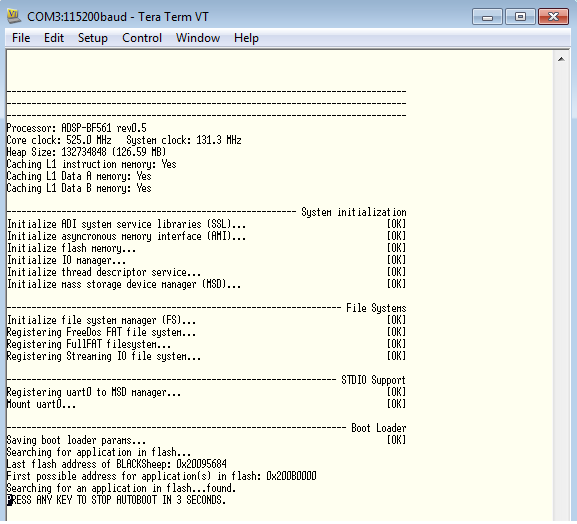
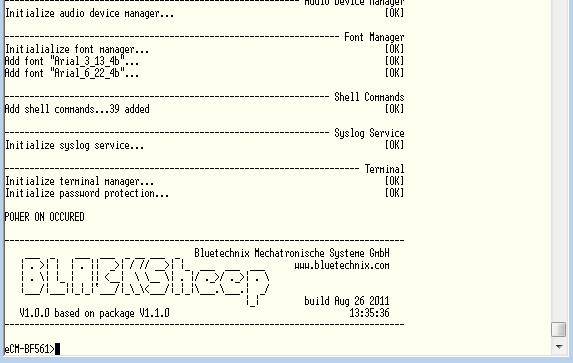
After the CDK is powered up , the green LED (6) is on and you see a text output on the Terminal console.
This is the output of the BLACKSheep Bootloader don't press any key and wait 3 seconds before the Board Support Package is loaded.
After booting is completed you see the eCM-BF561> Prompt and the red LED (4) flashes every 500ms. If you stop autoboot and enter the Bootloader by accident you see a eCM-BF561 boot> prompt. You can press the reset button (4) or enter reboot in the commandline.
Initialize the ISM
You can use the commandline framegrabber interface to initialize your ISM to various resolutions.
NOTE: all commands and device names are case-sensitive!
ISM-MT9P031
eCM-BF561>fg -init MT9P031 -svga -int0
Initialize MT9P031...
(MT9P031calcPLL): PLL output clock is 29.96 MHz
Adding Device to framegrabber...
done.
Device Name 'APT1801-0' added.
Adjusting Autoexposure ..............  OK
By using the command fg -init MT9P031 -svga -int0 the camera is configured using SVGA resolution. Other possible resolutions are:
eCM-BF561>fg -init MT9P031 -qvga -int0
eCM-BF561>fg -init MT9P031 -vga -int0
eCM-BF561>fg -init MT9P031 -svga -int0
eCM-BF561>fg -init MT9P031 -xga -int0
eCM-BF561>fg -init MT9P031 -uxga -int0
eCM-BF561>fg -init MT9P031 -mres -int0
(the -mres switch sets the ISM to the maximum resolution possible)
In order to change to another resolution or initialize the ISM again, the device must be closed first. This can be done by issuing the close command:
eCM-BF561>fg -close
 Close Device 0 and remove it from framegrabber...done.
When using the Initialize the camera with the fg -init commands above the Driver performs an auto-exposure which might take some time. If you want to bypass autoexposure you can provide the shutterwidth directly via the -sw switch.
CM-BF561>fg -init MT9P031 -int0 -svga -sw 200
Initialize MT9P031...
(MT9P031calcPLL): PLL output clock is 29.96 MHz
Adding Device to framegrabber...
done.
Device Name 'APT1801-0' added.
fg -info displays the current resolution and colorspace of a framegrabber device
eCM-BF561>fg -info
 Device 0 Information:
 x: 800
 y: 600
 fr 9.5
 Color Mode: Bayer (GRBG) 12-bit
ISM-MT9M131
The MT9M131 driver currently supports only full resolution (-mres = 1280x1024) and half-resolution (-cres = 640x512)
eCM-BF561>fg -init MT9M131 -cres -int0
eCM-BF561>fg -init MT9M131 -mres -int0
ISM-MT9M024
The MT9M024 driver currently supports only full resolution (-mres = 1280x960) and half-resolution (-cres = 640x480)
eCM-BF561>fg -init MT9M024 -cres -int0
eCM-BF561>fg -init MT9M024 -mres -int0
Grab Pictures
For grabbing single images from any of ISMs and viewing them in your browser first change to the browsers root directory
eCM-BF561>cd web
eCM-BF561>ls
Directory of rd0:\web
00.00.1980 00:00 <DIR>           .
00.00.1980 00:00 <DIR>           ..
31.12.2005 00:00            3803 index.html
31.12.2005 00:00            1663 Blackfin.jpg
31.12.2005 00:00            3223 bluetechnix_logo.gif
31.12.2005 00:00            1616 Collaborative.jpg
eCM-BF561>
Check if you can reach the CDK Webserver by pointing your browser to https://192.168.0.10 . You should see a similar homepage

You can grab images from the ISM and save them in JPEG or BMP format.
Grab an image and save as BMP
eCM-BF561>fg -getimg -bmp image.bmp
 Waiting for frames...done.
 Converting from Bayer pattern...done.
 converting to RGB32bit...done.
 converting to windows bitmap...done.
 save to file image.bmp...done.
 1440054 of 1440054 Bytes written
eCM-BF561>
Grab an image and save as JPEG
eCM-BF561>fg -getimg -jpg image.jpg
 Waiting for frames...done.
 Converting from Bayer pattern...done.
 Setup JPEG encoder...done.
 Encoding captured image to JPEG
 and save to file image.jpg...done.
eCM-BF561>
Display images in browser
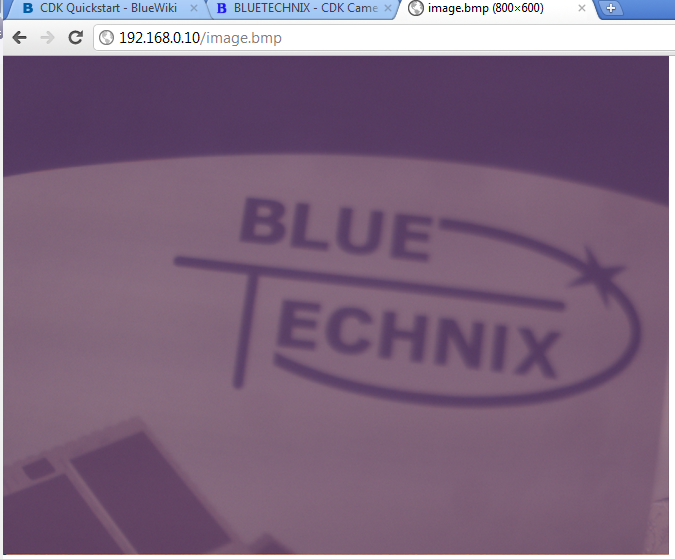
Point your browser to https://192.168.0.10/image.jpg and https://192.168.0.10/image.bmp to display and save the images in your browser.
you can call fg -getimg -jpg image.jpg or fg -getimg -bmp image.bmp from the comandline severall times to and refresh your browser to get new pictures.
Save images on SDCARD
Instead of the internal Ramdisk which is only 16MB images can be stored on a uSD Card inserted in the slot. The card must be present at startup and is mounted automatically as sd0:. you can check with the pinfo command if the card is present:
eCM-BF561>pinfo
Partition overview:
      NAME  FILESYSTEM  WORKING DIRECTORY
    uart0:       strio  "\"
      rd0:     fullfat  "\web\"
      sd0:     fullfat  "\"
Change to the sdcard:
eCM-BF561>cd sd0:
You can grab images like in sections above, umount the sdcard via the umount command and insert it into you Computer's cardreader.
eCM-BF561>umount sd0:
 Unmount partition...
 Partition found and successfully unmounted.
What's next?
eCM-BF561>help
Gives you a list of available commands. Every command has a -h switch which prints further help text or look at the BLACKSheep®_V1.0.0_Command_Reference


