Multi-ToF platform

Product description
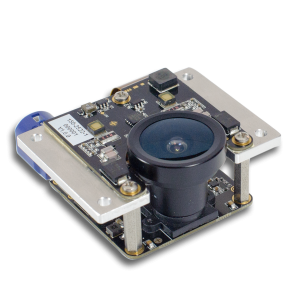
The multi-ToF platform is an ecosystem for multiple sensors working in parallel. The platform allows us to integrate different sensors in an easy way. It gives software developers an environment close to their final target platform for developing, testing and deploying their application.
Manuals
Bluetechnix 'Time of Flight' API
The multi-ToF platform is supported by our ToF API. The API can be used to communicate to the multi-ToF platform, if it is connected to an external host via Ethernet. But it can also be used to read the stream and configure the platform if the application is running on the Tegra processor on the CamHub itself. An example is preinstalled on the Tegra which shows how to get the data and how to read and write registers.
To run the example on the Tegra please proceed the following steps:
- login via SSH (host: 192.168.0.10, user: nvidia, password: nvidia)
- In the user directory there is a folder BltTofApi containing the following:
examples/          < example code and Makefile
inc/               < header files
lib/               < shared library
- Go into examples, run make and start the example with ./example
- The example then asks you to select an interface, where you select Ethernet
When the example asks to select a frame mode, use one that is supported by your device (DistAmp is always supported)
- The example shows the usage of the API interface like reading and writing modulation frequency, integration time, offset and frame rate.
It also gets frames from and reads and writes registers, among other advanced functionalities.
The source code is well documented and can also be used for copy&paste.
Further information on the API can be found at ToF API.
Interfacing and Demo Applications
There are some demo and interfacing applications available on the customer support package CD downloadable from the software download.
- BLT-ToF-Suite
- A powerful tool where all registers can be read and written and which shows the image stream. It can also be used as a getting started tool to get familiar with the multi-ToF platform. The BLT-ToF-Suite is included in the support CD available at the download section.
Connect an additional FRONT END
The multi-ToF platform Kit gets standardly delivered with one FRONT END. If you want to connect an additionally FRONT END, please follow the steps below.
Calibration
- Preparations
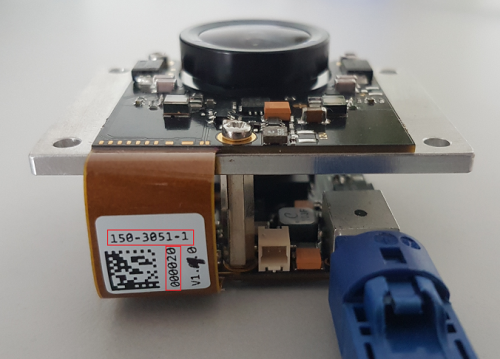
- Read the article number from the sticker on the FRONT END (e.g. 150-3051-1-000020)
- Disconnect the FRONT END which was delivered with the kit.
- Connect the new FRONT END to slot 0.
- Power up the Hub.
- NOTE: All calibration files corresponding to a specific FRONT END get stored in /home/nvidia/150-3051-1-XXXXXX/settings/. The first time multi-ToF platform powers up with a new FROND END connected, the settings directory will be created automatically.
- Fixed Pattern Pixel Noise (FPPN)
- Please request the fppn calibration file for your FRONT END from BECOM Bluetchnix.
- Copy the fppn calibration file to the settings directory of your FRONT END using scp or tftp (/home/nvidia/150-3051-1-XXXXXX/settings/fppn_7.bin).
- Wiggling
- The wiggling calibration file is included in the multi-ToF platform_support_package (calibration/wiggling).
- Use the Downloader form the Bluetechnix ToF Suite to download the calibration file to your device.
- Start the Bluetechnix ToF Suite.
- Make sure your camera is connected and accessible via TCP/IP.
- Open the Downloader (Tools-->Downloader).
- Select 'Wiggling'.
- Open the calibration file.
- Click on 'Write flash' and follow the screen outputs and wait for the process to finish.
- Lens Calibration
- The lens calibration file is included in the multi-ToF platform_support_package (calibration/lens).
- Use the Downloader form the Bluetechnix ToF Suite to download the calibration file to your device.
- Start the Bluetechnix ToF Suite.
- Make sure your camera is connected and accessible via TCP/IP.
- Open the Downloader (Tools-->Downloader).
- Select 'LensCalibration'.
- Open the calibration file.
- Click on 'Write flash' and follow the screen outputs and wait for the process to finish.
- Distance Offset Calibration
- Place your camera co-planar in front of a uniform white target.
- Avoid extreme environmental light conditions or avoid light completely.
- Set the desired modulation frequency using register ModulationFrequency.
- Check the amplitude in the center of the image and increase/decrease the IntegrationTime until the amplitude is about 500 in the center.
- Measure the real distance in millimeters from the camera to the white target. Write this value into register RealWorldXCoordinate.
- Write decimal value 19 into register CalibrationCommand and wait until the CalibrationExtended register, Bits 0..7, read decimal value 161 (= finished). The appropriate DistOffsetX register is updated.
- If you want to keep the setting, don’t forget to save registers to flash. This can be done by using the Visualizer (Configuration-->Save registers permanently).
- Run all FRONT ENDs together
Once you have calibrated and loaded the calibration files for each front-end on slot 0 power of the platform and connect the additional front-ends to the other slots.
Configuration
On default settings the BltTofApp is streaming on UDP port 10002 and the control interface is listening on port 10001. To run two or more BltTofApps in parallel you have to configure the UDP streaming and TCP control interface ports differently for each FRONT END.
- The UDP streaming port can be changed through the register Eth0UdpStreamPort(0x024e). Bluetechnix recommends to keep the original settings for the FRONT END which was included in the multi-ToF platform Kit and use the port 10012 for the second FRONT END, 10022 for the third FRONT END and 10032 for the fourth FRONT END.
- The TCP control interface port can be changed through the register Eth0TcpCtrlPort(0x024b). Bluetechnix recommends to keep the original settings for the FRONT END which was included in the multi-ToF platform Kit and use the port 10011 for the second FRONT END, 10021 for the third FRONT END and 10031 for the fourth FRONT END.
- If you want to keep the setting, don’t forget to save registers to flash. This can be done by using the Visualizer (Configuration-->Save registers permanently).
NOTE: After changing the these parameters you have to change it as well in the configuration in the Bluetechnix Tof Suite and reconnect (or simply use the 'List available devices' function.
Auto Start
On delivery condition only the FRONT END connected to slot 0 gets started at boot time. To start the more than one slot automatically the file /etc/rc.local has to be modified.
Here an example how to start slot 0 and slot 1:
...
cd /home/nvidia && ./BltToFApp 0 > TofAppLog0 &
sleep(3)
cd /home/nvidia && ./BltToFApp 1 > TofAppLog1 &
...
Trigger Script
If two or more FRONT ENDs are used, their emitted infrared light may influence each other. To overcome this problem the preinstalled trigger application can be used. With that script it is possible to trigger the FRONT ENDs alternately (or if wished simultaneously).
- FRONT END configuration
To use the trigger script the VideoMode of the FRONT END has to be disabled.
- Clear bit 0 in register Mode0 (0x0001).
- If you want to keep the setting, don’t forget to save registers to flash. This can be done by using the Visualizer (Configuration-->Save registers permanently).
If the VideoMode is disabled, the FrameRate register of the FRONT END becomes ineffective. If the trigger script is used the frame rate is configurable through a pipe which gets passed to the stdin of the application. This pipe has to be created before.
mkfifo frameRate
- Usage
NOTE: you need to be root to run this application.
./trigger -p [slot numbers] < frameRate
echo 20 > frameRate
Slots that should be triggered alternately has to be separated with a '-'. Slots that should be triggered simultaneously should not be separated.
- Examples
- Trigger 2 FRONT ENDs (slot 0 and slot 1) alternately with a frame rate of 20.
./trigger -p 0-1 < frameRate&
echo 20 > frameRate
- Trigger 4 FRONT ENDs alternately with a frame rate of 25.
./trigger -p 0-1-2-3 < frameRate&
echo 25 > frameRate
- Trigger 2 FRONT ENDs (slot 0 and slot 1) simultaneously with a frame rate of 10.
./trigger -p 01 < frameRate&
echo 10 > frameRate
- Trigger 2 FRONT ENDs simultaneously and alternately to 2 other FRONT ENDs.
./trigger -p 01-23 < frameRate&
echo 20 > frameRate
- Auto start
To start the trigger script automatically the file /etc/rc.local has to be modified.
cd /home/nvidia && ./trigger -p 0-1 < frameRate &
echo 20 > /home/nvidia/frameRate
cd /home/nvidia && ./BltToFApp 0 > TofAppLog0 &
sleep(3)
cd /home/nvidia && ./BltToFApp 1 > TofAppLog1 &
Download
For additional software downloads, please refer to the software download.
If you encounter any problems feel free to contact us at support@bluetechnix.com
