Sentis-ToF-M100 uClinux Development Package
Purpose
This package is intended for Linux developers which want to bring their application onto the Sentis-ToF-M100 device.
It is NOT intended as alternative firmware for the Sentis device!
Releases
Release 1.0.0
- Release date
- 2013-12-17
- Supported hardware
- Sentis-ToF-M100 ≥V2.0.0
- Download path
- https://datasheets.becom-group.com/goto/Sentis/ToF/M/100/software/Firmware%20Development%20Packages/uClinux%20Development%20Package/
- Base board support package
- Analog Devices 2012R2
- Used tool chain
- Analog Devices 2012R2
- Release Notes
The Sentis-ToF-M100 uClinux BSP V1.0.0 contains the Linux kernel, u-boot an the applications coreb_loader, eth_udp_streaming_thread, firmware_identifier, firmware_update and register.
- Known issues
- At a higher frame rate than 25fps the distance image flickers sometimes. It gets worse as higher the frame rate becomes.
- The temperature compensation does not work properly. Please contact support@bluetechnix.com for further information.
Setting up uClinux
Flash u-boot
In order to flash u-boot, please follow these steps:
   Download the u-boot binary provided by Bluetechnix
   Download and start the Sentis-ToF-M100-Downloader provided by Bluetechnix
   Make sure your sensor is connected and accessible via TCP/IP
   Set the dip switch to 0000 (boot from spi flash) and power on the Sentis-ToF-M100
   When the sensor is in bootloader mode, it toggles its alive led every second; register "Mode 0" also tells the current state.
   If not in bootloader mode, click on "Run bootloader"
   Be sure to be in bootloader mode and wait for the sensor to initialize properly
   Click on "Flash specific"
   Select the firmware binary provided by Bluetechnix
   Select Parallel Intel Nor Flash and set the flash address to 0x0
   Wait for the process to finish
   Power off your Sentis-ToF-M100
   Set the dip switch to 1000 (boot from parallel flash)
   Power on the sensor: it boots u-boot
Flash uImage
In u-Boot type:
set serverip <ip-address>
<ip-address> being the ip of the tftp server (e.g. 192.168.0.1)
set ipaddr <ip-address>
<ip-address> being the ip to give the sensor (e.g. 192.168.0.10)
tftp $(loadaddr) uImage;protect off 0x20040000 +$(filesize);erase 0x20040000 +$(filesize);cp.b $(loadaddr) 0x20040000 $(filesize)
The uImgae gets loaded over TFTP and gets stored in the parallel flash at address 0x20040000. A guide how to instal a TFTP server can be found here
Load applications
- Download the uClinux applications provided by Bluetechnix
- Boot your Sentis-ToF-M100
- Mount the "coreb loader file" partition with write permissions.
mount -t jffs2 -o rw,sync /dev/mtdblock2 /mnt
- Change to directory /mnt
cd /mnt
- Transfer the applications for example via TFTP to your Sentis-ToF-M100 and store them in the mounted partition.
tftp -r coreb_loader -g <ip-address>
tftp -r eth_udp_streaming_thread -g <ip-address>
tftp -r firmware_identifier -g <ip-address>
tftp -r firmware_update -g <ip-address>
tftp -r register -g <ip-address>
<ip-address> being the tftp server IP address (e.g. 192.168.0.1)
- Change permissions
chmod 755 *
Load firmware
- Download the core B firmware binary loader file provided by Bluetechnix
- Change to the home directory
cd /
- Transfer the new loader file for example via TFTP to your Sentis-ToF-M100. The new loader file must be renamed to "sentis_tof_m100_uclinux_firmware_CoreB.ldr". A guide how to install a TFTP server can be found here.
tftp -r sentis_tof_m100_uclinux_firmware_CoreB.ldr -g <ip-address>
<ip-address> being the tftp server (e.g. 192.168.0.1)
- Mount the "coreb loader file" partition with write permissions if it is not already mounted.
mount -t jffs2 -o rw,sync /dev/mtdblock2 /mnt
- Change to directory /mnt
cd /mnt
- Start the application firmware_update. This application will update the firmware and clear the configuration table.
./firmware_update ../sentis_tof_m100_uclinux_firmware_CoreB.ldr
Note: After loading the firmware you have to perform an offset calibration. Offset calibration is described in Section Offset Calibration.
Quick Start
Here is how to start with uClinux on your Sentis-ToF-M100.
- Default dip switch settings:
1000
- Connect to Sentis-ToF-M100 to your computer.
- Use your Serial Terminal Program of your choice with the following settings:
Baudrate: 115200
FlowControl: NONE
Parity: None
Stop Bits: 1
Data: 8Bit
After uClinux bootet on your Sentis-ToF-M100, mount the "coreb loader file" partition.
mount -t jffs2 -o ro,sync /dev/mtdblock2 /mnt
The partition contains the core B loader file (sentis_tof_m100_uclinux_firmware_CoreB.ldr) and some applications:
Check firmware version
Start the application firmware_identifier. This application will read out firmware informations from the core B loader file and print it on the serial terminal.
cd /mnt
./firmware_identifier
Start core B
The application coreb_loader loads the loader file sentis_tof_m100_uclinux_firmware_CoreB.ldr, which is located in the same directory, to core B and starts executing on core B.
./coreb_loader
Start streaming
After starting core B the distance and amplitude data can be streamed over a UDP communication over ehternet. For that start the eth_upd_streaming_thread application. The data can be visualized with the Sentis-ToF-M100-Visualizer on a connected PC.
./eth_udp_streaming_thread &
Read or write Register
The Sentis-ToF-M100 registers can be written or read with the application register.
./register read|write register-address-hex [register-value-to-write]
For example the frame rate can be read out with
./register read 0xA
and set to 20fps with
./register write 0xA 20
Software Architecture
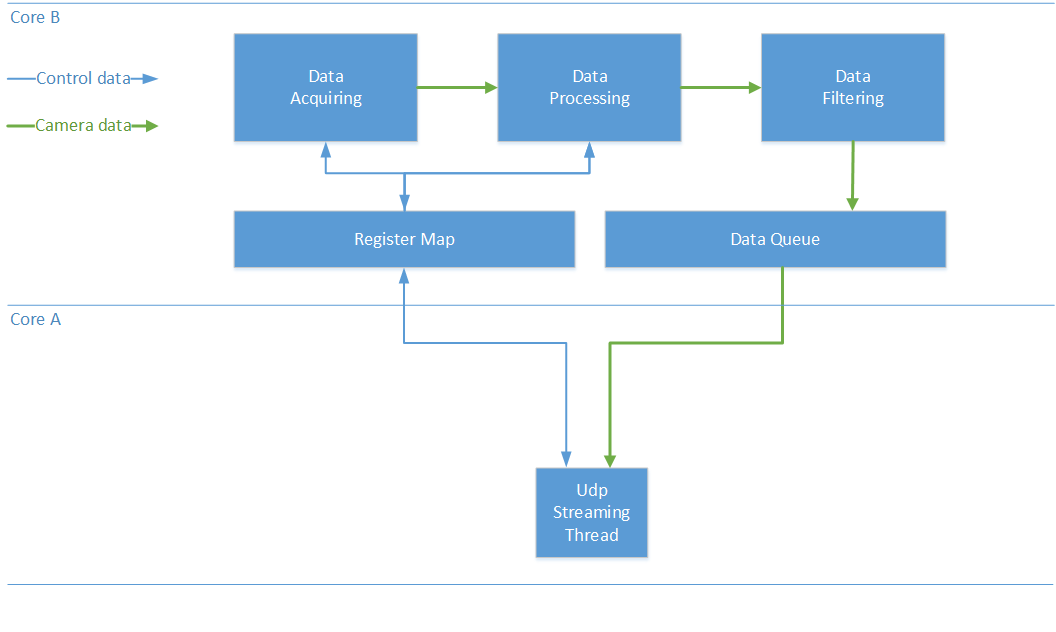
Components and data flow
On both cores there are independently working modules that need synchronization and exchange of data. Basically there is visual data from the camera and the register map data. The figure below shows the structure for a better understanding.
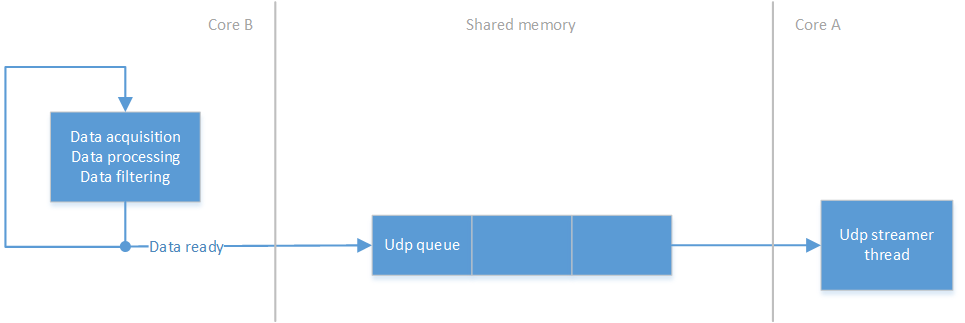
Program flow
This section shows the program flow of the Upd streamning thread.
Buffer management
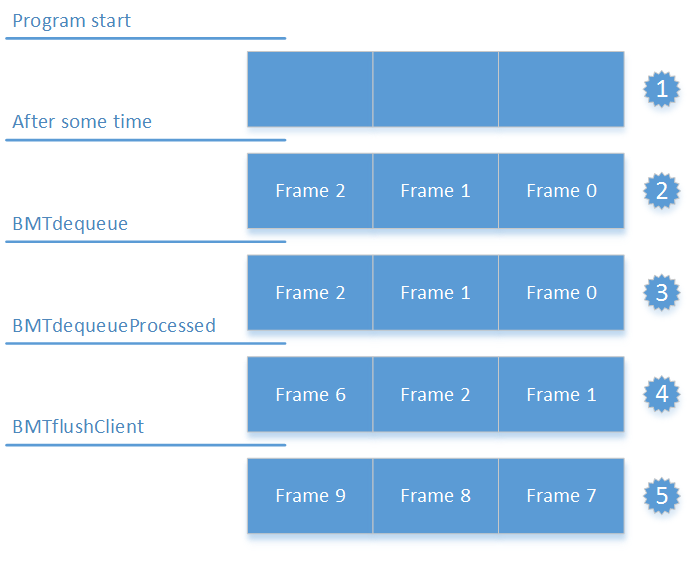
Core B manages the buffers with the processed camera data. The figure below shows the basic structure: Core B generates data at its own predefined pace. This data is then simultaneously inserted in the client’s queue. If there is no free slot in the client’s queue, nothing is inserted. By default the queue has a length of three. Even if all three slots are filled up, core B continues to generate data.
- A client can access the data via following functions
This function is for retrieving the data:
| Function Name | Parameters | Description |
| BMTdequeue | T_BMT_CLIENT_HANDLE pa_tHndl | The handle of the buffer manager |
| T_BMT_BUFFER_DESC **pa_ptBuffer | Result: The data buffer (is succeded) | |
| Returns T_ERROR_CODE | Error code (ERR_TCI_INVALID_HANDLE, ERR_BMT_BUFFER_EMPTY) or ERR_NONE |
This function removes the last item in the queue:
| Function Name | Parameters | Description |
| BMTdequeueProcessed | T_BMT_CLIENT_HANDLE pa_tHndl | The handle of the buffer manager |
| Returns T_ERROR_CODE | Error code (ERR_TCI_INVALID_HANDLE, ERR_BMT_BUFFER_EMPTY) or ERR_NONE |
This function removes all items in the queue:
| Function Name | Parameters | Description |
| BMTflushClient | T_BMT_CLIENT_HANDLE pa_tHndl | The handle of the buffer manager |
| Returns T_ERROR_CODE | Error code (ERR_TCI_INVALID_HANDLE, ERR_BMT_BUFFER_EMPTY) or ERR_NONE |
Interactions and the manager’s behavior is explained more closely in the figure below. The following five steps
explain what happens in this figure. It is an example of a slow client with a lower frame rate than core B.
- The program just started and no data is in the buffer queue.
- After three cycles core B has generated enough data to fill the queue and nothing changes anymore.
- The client called BMTdequeue and is processing the camera data of frame 0. The data, however stays in the shared memory.
- The client called BMTdequeueProcessed. The buffer manager discards frame 0 and inserts one new frame into the queue. The client can now continue with frame 1. Frames 3 through 5 are lost for this client and frame 1 and 2 must be dequeued in order to get to frame 6.
- In that slow case the client decided to call BMTflushClient. This way frame 6 is lost, too. Shortly, the buffer is filled with fresh data again.
Register access
A register can be written using the register-write function:
| Function Name | Parameters | Description |
| TCIregisterWrite | T_TCI_HANDLE pa_tHndl | The handle of the service |
| unsigned short pa_usRegister | Register address to write to | |
| void *pa_pBuffer | Value(s) to write into register | |
| unsigned short pa_usLength | Length of pa_pBuffer. Must be a multiple of 2 since a register is 2 bytes wide | |
| Returns T_ERROR_CODE | Error code (ERR_TCI_INVALID_HANDLE, ERR_TCI_ILLEGAL_REG_WRITE) or ERR_NONE |
A register can be written using the register-write function:
| Function Name | Parameters | Description |
| TCIregisterRead | T_TCI_HANDLE pa_tHndl | The handle of the service |
| unsigned short pa_usRegister | Register address to read from | |
| void *pa_pBuffer | Result: Value(s) read from register | |
| unsigned short *pa_pusLength | Length of pa_pBuffer i.e. the number of bytes to read. Must be a multiple of 2 since
a register is 2 bytes wide. Result: Bytes actually read | |
| Returns T_ERROR_CODE | Error code (ERR_TCI_INVALID_HANDLE, ERR_TCI_REGISTER_END_REACHED)
or ERR_NONE |
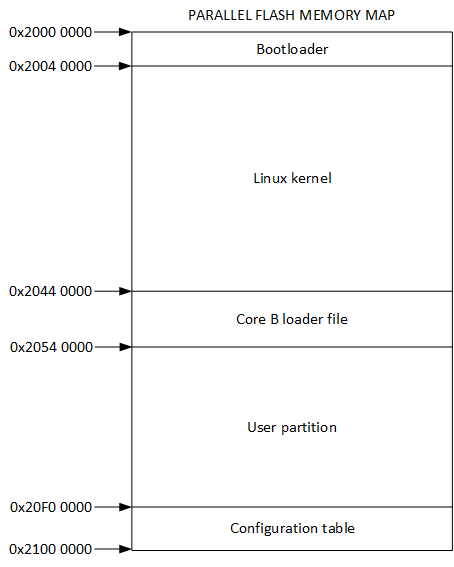
Parallel flash memory map
The parallel flash is split into 5 partitions. The first two partitions contain the boot loader and Linux kernel. The "Core B loader file" partition is JFFS2 formatted and contains the core B loader file as well as some applications. The partition from 0x20540000 to 0x20F00000 is reserved for the user. In the last 1MB core B saves it's configuration tables.
SDRAM memory map
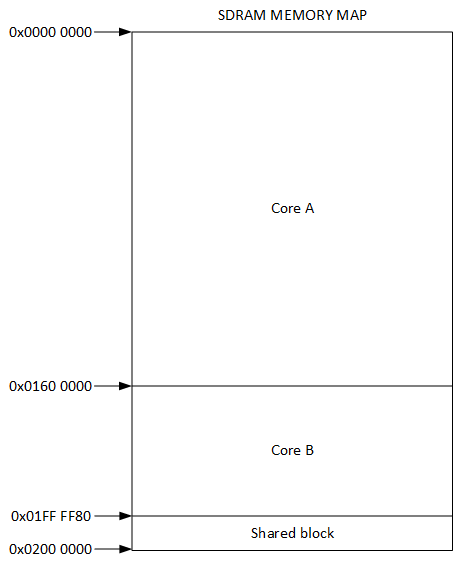
The SDRAM is divided between core A and core B. The first 22MB are allocated to core A and the following nearly 10MB from address 0x01600000 to 0x01FFFF80 are allocated to core B. The last 128 bytes are shared by both cores and are used as a data interface.
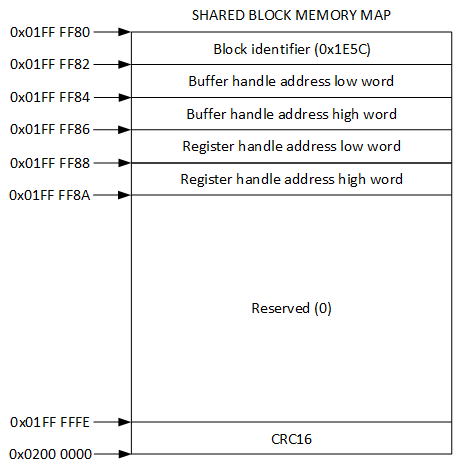
The shared block contains a block identifier, the buffer handle address, the register handle address and a CRC16 checksum. This shared block get written by core B. The block identifier get set to 0x1E5C after core A finished its initialisations and starts capturing images. The CRC16 checksum is build over the address range from 0X01FFFF82 to 0x01FFFFFE.
Resource table
| Resource | Core A | Core B |
| SDRAM | 22MB | ~10MB |
| Parallel Flash | 15MB | 1MB |
| SPI Flash | - | 8MB |
| L1 cache | 16kB instruction and 32kB data | 16kB instruction and 32kB data |
| L2 cache | - | 128kB |
| UART | 1 | - |
| SPI | - | 1 |
| PPI 16Bit | 1 (PPI 1) | 1 (PPI 0) |
| Ethernet | 1 | - |
| GPIO | GPIO 1, GPIO 3, GPIO 4 | GPIO 2 |
| Timer | - | 12 |
Software Update
Sentis-ToF-M100 Core B Firmware Update
A firmware update will wipe your register map (including offset calibration). The camera is reset to factory state and you have to perform an offset calibration afterwards. Offset calibration is described in Section Offset Calibration.
In order to update your Sentis-ToF-M100 core b firmware, please follow these steps:
- Download the firmware binary loader file provided by Bluetechnix
- Boot your Sentis-ToF-M100
- Transfer the new loader file for example via TFTP to your Sentis-ToF-M100. A guide how to install a TFTP server can be found here.
tftp -r sentis_tof_m100_uclinux_firmware_CoreB.ldr -g 192.168.0.2
- Mount the "coreb loader file" partition with write permissions.
mount -t jffs2 -o rw,sync /dev/mtdblock2 /mnt
- Change to directory /mnt
cd /mnt
- Start the application firmware_update. This application will update the firmware and clear the configuration table.
./firmware_update ../sentis_tof_m100_uclinux_firmware_CoreB.ldr
Download
For software downloads, please refer to our download center for customers here: https://support.bluetechnix.com/software/. In order to access the files you need a valid registration. If you don't have a valid Bluetechnix account, please sign up here: https://support.bluetechnix.com/software/CreateUser.aspx If you encounter any problems feel free to contact us at support@bluetechnix.com
uCLinux Development Package:
