Argos®2D D100 Camera Quick start
Zur Navigation springen
Zur Suche springen
This document describes various specifics of the Argos®2D D100 camera.
Quick start
Here is how to start with your Argos®2D D100 Camera development board based on the CM-BF561 SoM.
- Remove the Cover from the camera. It is already unscrewed and can be removed with gentle force.
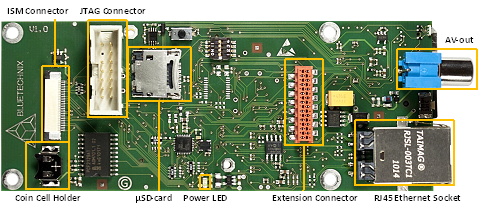
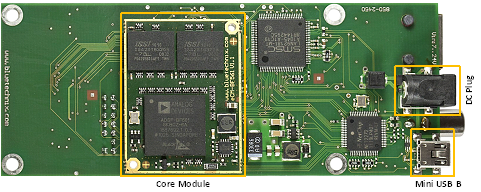
Inside the Argos®2D D100 Camera
Top side connector placement:
Bottom side connector placement:
- Configure the DIP switches on the base board for parallel flash boot.
| ≥V1.0.X | |||||||||||||||||||||||||||||||
| 1 | 2 | 3 | 4 | 5 | 6 | 7 | 8 | 9 | 0 |
- Optionally, connect to the serial terminal to see the board's boot messages (via eCAM-EXT-Debug board on the red extension connector). If your Operating system does not install the drivers for a virtual comport, a USB-UART driver installation guide can be found here
- Use your Serial Terminal Program of your choice with the following settings:
Baudrate: 115200
FlowControl: NONE
Parity: None
Stop Bits: 1
Data: 8Bit
Starting up
- Connect to the Board with your serial terminal.
- Remove the cover from the lens.
- Connect 12V DC to the power connector on the back panel.
- Connect a monitor or TV via chinch cable on the back panel.
- If you like, connect Ethernet on the back panel.
- After power up a live video stream should be seen on the TV.
Web demo application
- Type ifconfig into the serial terminal to get the IP adress of the Argos®2D D100.
eCM-BF561>ifconfig
Nof interfaces: 1

Int 0:
  MAC address- - - - - - - - - - : AC:DE:48:01:02:03
  DHCP enabled - - - - - - - - - : no
  IP address - - - - - - - - - - : 192.168.0.10
  Subnet mask  - - - - - - - - - : 255.255.255.0
  Gateway  - - - - - - - - - - - : 0.0.0.0
- If you want to change the IP address, type
ifconfig -ip xxx.xxx.xxx.xxx
- To enable DHCP type
ifconfig -dhcp yes
- For further information see
- Enter the IP address of the Argos®2D D100 into your browser's address line.


