Debug Agent installation guide Windows7
Zur Navigation springen
Zur Suche springen
Please read our notes regarding Windows 7 64 bit support (does not affect the 32bit version)
Quick Installation Guide
The VDSP++ Configurator from Bluetechnix does not work under Windows 7, here is a mini how-to to manually install the drivers
Tested with:
- VDSP++ 5.0 Update 8
- Windows 7 Professional 32Bit
- CM-BF561 on DEV-Bf5xx-DALite 5.1.1
Instructions
- Get the most recent VDSP++Configurator_V2.0.zip from the web [1]
- Unpack it
- in the folder there are severall .reg files. Double-click the files for the CoreModules you want to use. e.g. bluetechnix_cm-bf561_V5.0.reg for a CM-Bf561. You should get a Registry Key successfully added message. Use the x86 versions for 32bit systems and the x64 version for 64bit systems.
- Connect the USB port of the Debug Agent with your PC
- Windows will ask for a driver, point windows to the folder with the unpacked files.
- Start ADI's VisualDSP++ Configurator, usually located at Start-> Analog Devices -> VisualDSP++ Configurator
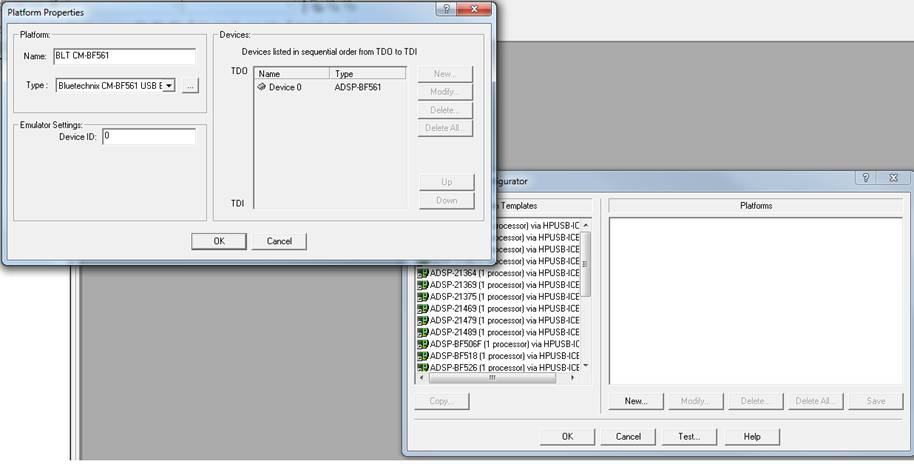
- In the platforms tab click on New..
- In the window now opening select Bluetechnix...(depends on your CoreModule) as Type.
- Assign a name to the platform and press OK
- In the platforms tab click on New..

- Start VDSP++
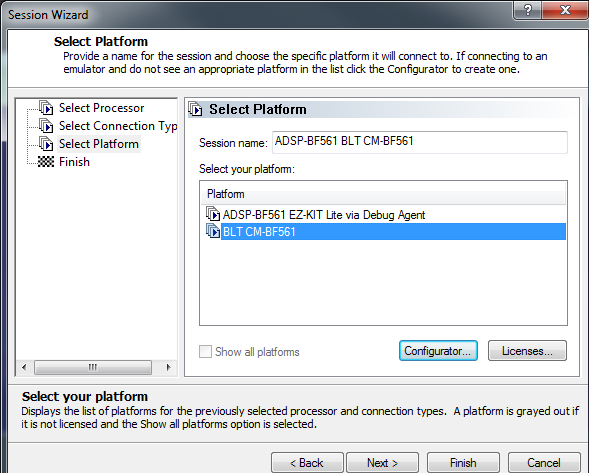
- Create a new Session
- Select your Processor and EZ-KIT lite as Connection Type
- In the select Platform dialog select the previously created platform (You might have o restart VDSP++ after creating the platform in the Configurator)
- Create a new Session

- Voilà - You're done!
Windows 7 / 64bit Support
Please note that the instructions below have been tested on few systems.
Windows7 x64 requires the use of signed drivers. To install the drivers on Windows7 x64, you need to switch Windows into Testmode. This can be done easily by following these instructions:
- Download DSEO from https://www.ngohq.com/home.php?page=dseo (at the time of writing 1.3b was the current version)
- Install VisualDSP++ 5.0. When asked if you want to install the driver software any, select Yes (multiple times)
- Update your installation of VisualDSP++ 5.0 ("Maintain this installation"). At the time of writing, Update 8 was current, allow installation of the drivers
- Locate the Emu_Drivers directory (usually: C:\Program Files (x86)\Analog Devices\VisualDSP 5.0\Setup\Emu_Drivers)
- Download the configurator package. Make sure it also contains the 64bit versions of the .reg files (they are named with *_x64.reg at the end)
- Copy the file blueda6432.inf to the Emu_Drivers directory (there are also the files WmUsbIce.sys and WmUsbIce64.sys)
- Run DSEO
- Select Enable Test Mode
- Select "Sign a system file"
- Select the WmUsbIce.sys file
- Select "Sign a system file"
- Select the WmUsbIce64.sys file
- Restart PC
- Connect device (Windows will complain that it couldn't find a driver)
- Go to Device Manager, select "Unknown device", select update driver and point to the directory where the blueda6432.inf file is
- Allow Windows to install the driver anyway
- Run DSEO and follow the instructions in the "Remove Watermark" part.
- Follow the instructions above to import the .reg files into the registry (use the *_x64.reg versions)
- Start "VisualDSP++ Configurator", select "Test". You should now already see the correct Core Module selected (Type). Press "Start".